Vue I18n Quickstart Guide
Vue.js doesn't have localization built into the framework, but lucky for us there's a simple solution - Vue I18n. Let's build a sample Vue.js app and then localize it with Vue I18n.


In the interest of a Quickstart guide, we're going to assume you're using Vue.js 3.0.0+ and the latest version of Vue I18n. We're not going to dive too deep, but I'm going to show you everything you need to know to get up and running as fast as possible.
Vue I18n is a powerful, highly configurable package. I'm going to show you my preferences, but rarely is that the only way of doing things.
Install and Setup Vue and Vue I18n
Start by creating a new project with npm init vue@latest. We'll call our project i18n-example, but otherwise accept all the defaults.
➜ npm init vue@latest

Vue.js - The Progressive JavaScript Framework

✔ Project name: … i18n-example
✔ Add TypeScript? … No / Yes
✔ Add JSX Support? … No / Yes
✔ Add Vue Router for Single Page Application development? … No / Yes
✔ Add Pinia for state management? … No / Yes
✔ Add Vitest for Unit Testing? … No / Yes
✔ Add Cypress for both Unit and End-to-End testing? … No / Yes
✔ Add ESLint for code quality? … No / Yes

Scaffolding project in /Users/jack/Code/i18n-example...

Done. Now run:

  cd i18n-example
  npm install
  npm run dev

➜
It gives us a few extra commands to run to install and compile everything, so run those. After, you'll be able to see visit http://localhost:3000/ to view your the default installation.
Next, install vue-i18n with
npm install vue-i18n@9Our un-localized starter app
We're going to create a very simple Vue component that will demonstrate simple translations as well as trickier cases like variable interpolation and pluralization. Our app will ask a user their name, how many placeholder images they would like and give them a choice between Nicolas Cage and Steven Segal placeholder images. Then we'll display the number of images they ask for.
We're modifying the base Vue app, so we're just going to create a new component and plug it into the starter page.
Here is our component Image.vue
<script>
export default {
    data() {
        return {
            name: '',
            number: '',
            type: '',
        }
    }
}
</script>

<template>

    <div>
        <h1>What is your name?</h1>
        <input type="text" v-model="name" />
        <p v-if="name">Hello, {{ name }}!</p>

        <h1>How many placeholder images would you like?</h1>
        <input type="number" v-model="number">

        <h1>Choose your placeholder subject</h1>
        <select v-model="type">
            <option value="https://www.placecage.com/200/300">Nic Cage</option>
            <option value="https://stevensegallery.com/200/300">Steven Segal</option>
        </select>

        <div v-if="number > 0 && type">
            <p v-if="number > 1">Here are {{ number }} images from {{ type }}</p>
            <p v-else>Here is 1 image from {{ type }}</p>
            <ul>
                <li v-for="n in number"><img :src="type" /></li>
            </ul>
        </div>
    </div>
</template>
And we'll just replace the TheWelcome component from App.vue with our new Image component. That looks like this:
<script setup>
import HelloWorld from './components/HelloWorld.vue'
import Image from './components/Image.vue'
</script>

<template>
  <header>
    <img alt="Vue logo" class="logo" src="./assets/logo.svg" width="125" height="125" />

    <div class="wrapper">
      <HelloWorld msg="You did it!," />
    </div>
  </header>

  <main>
    <Image />
  </main>
</template>
<!-- ... -->
Now when we visit our app, we see this:
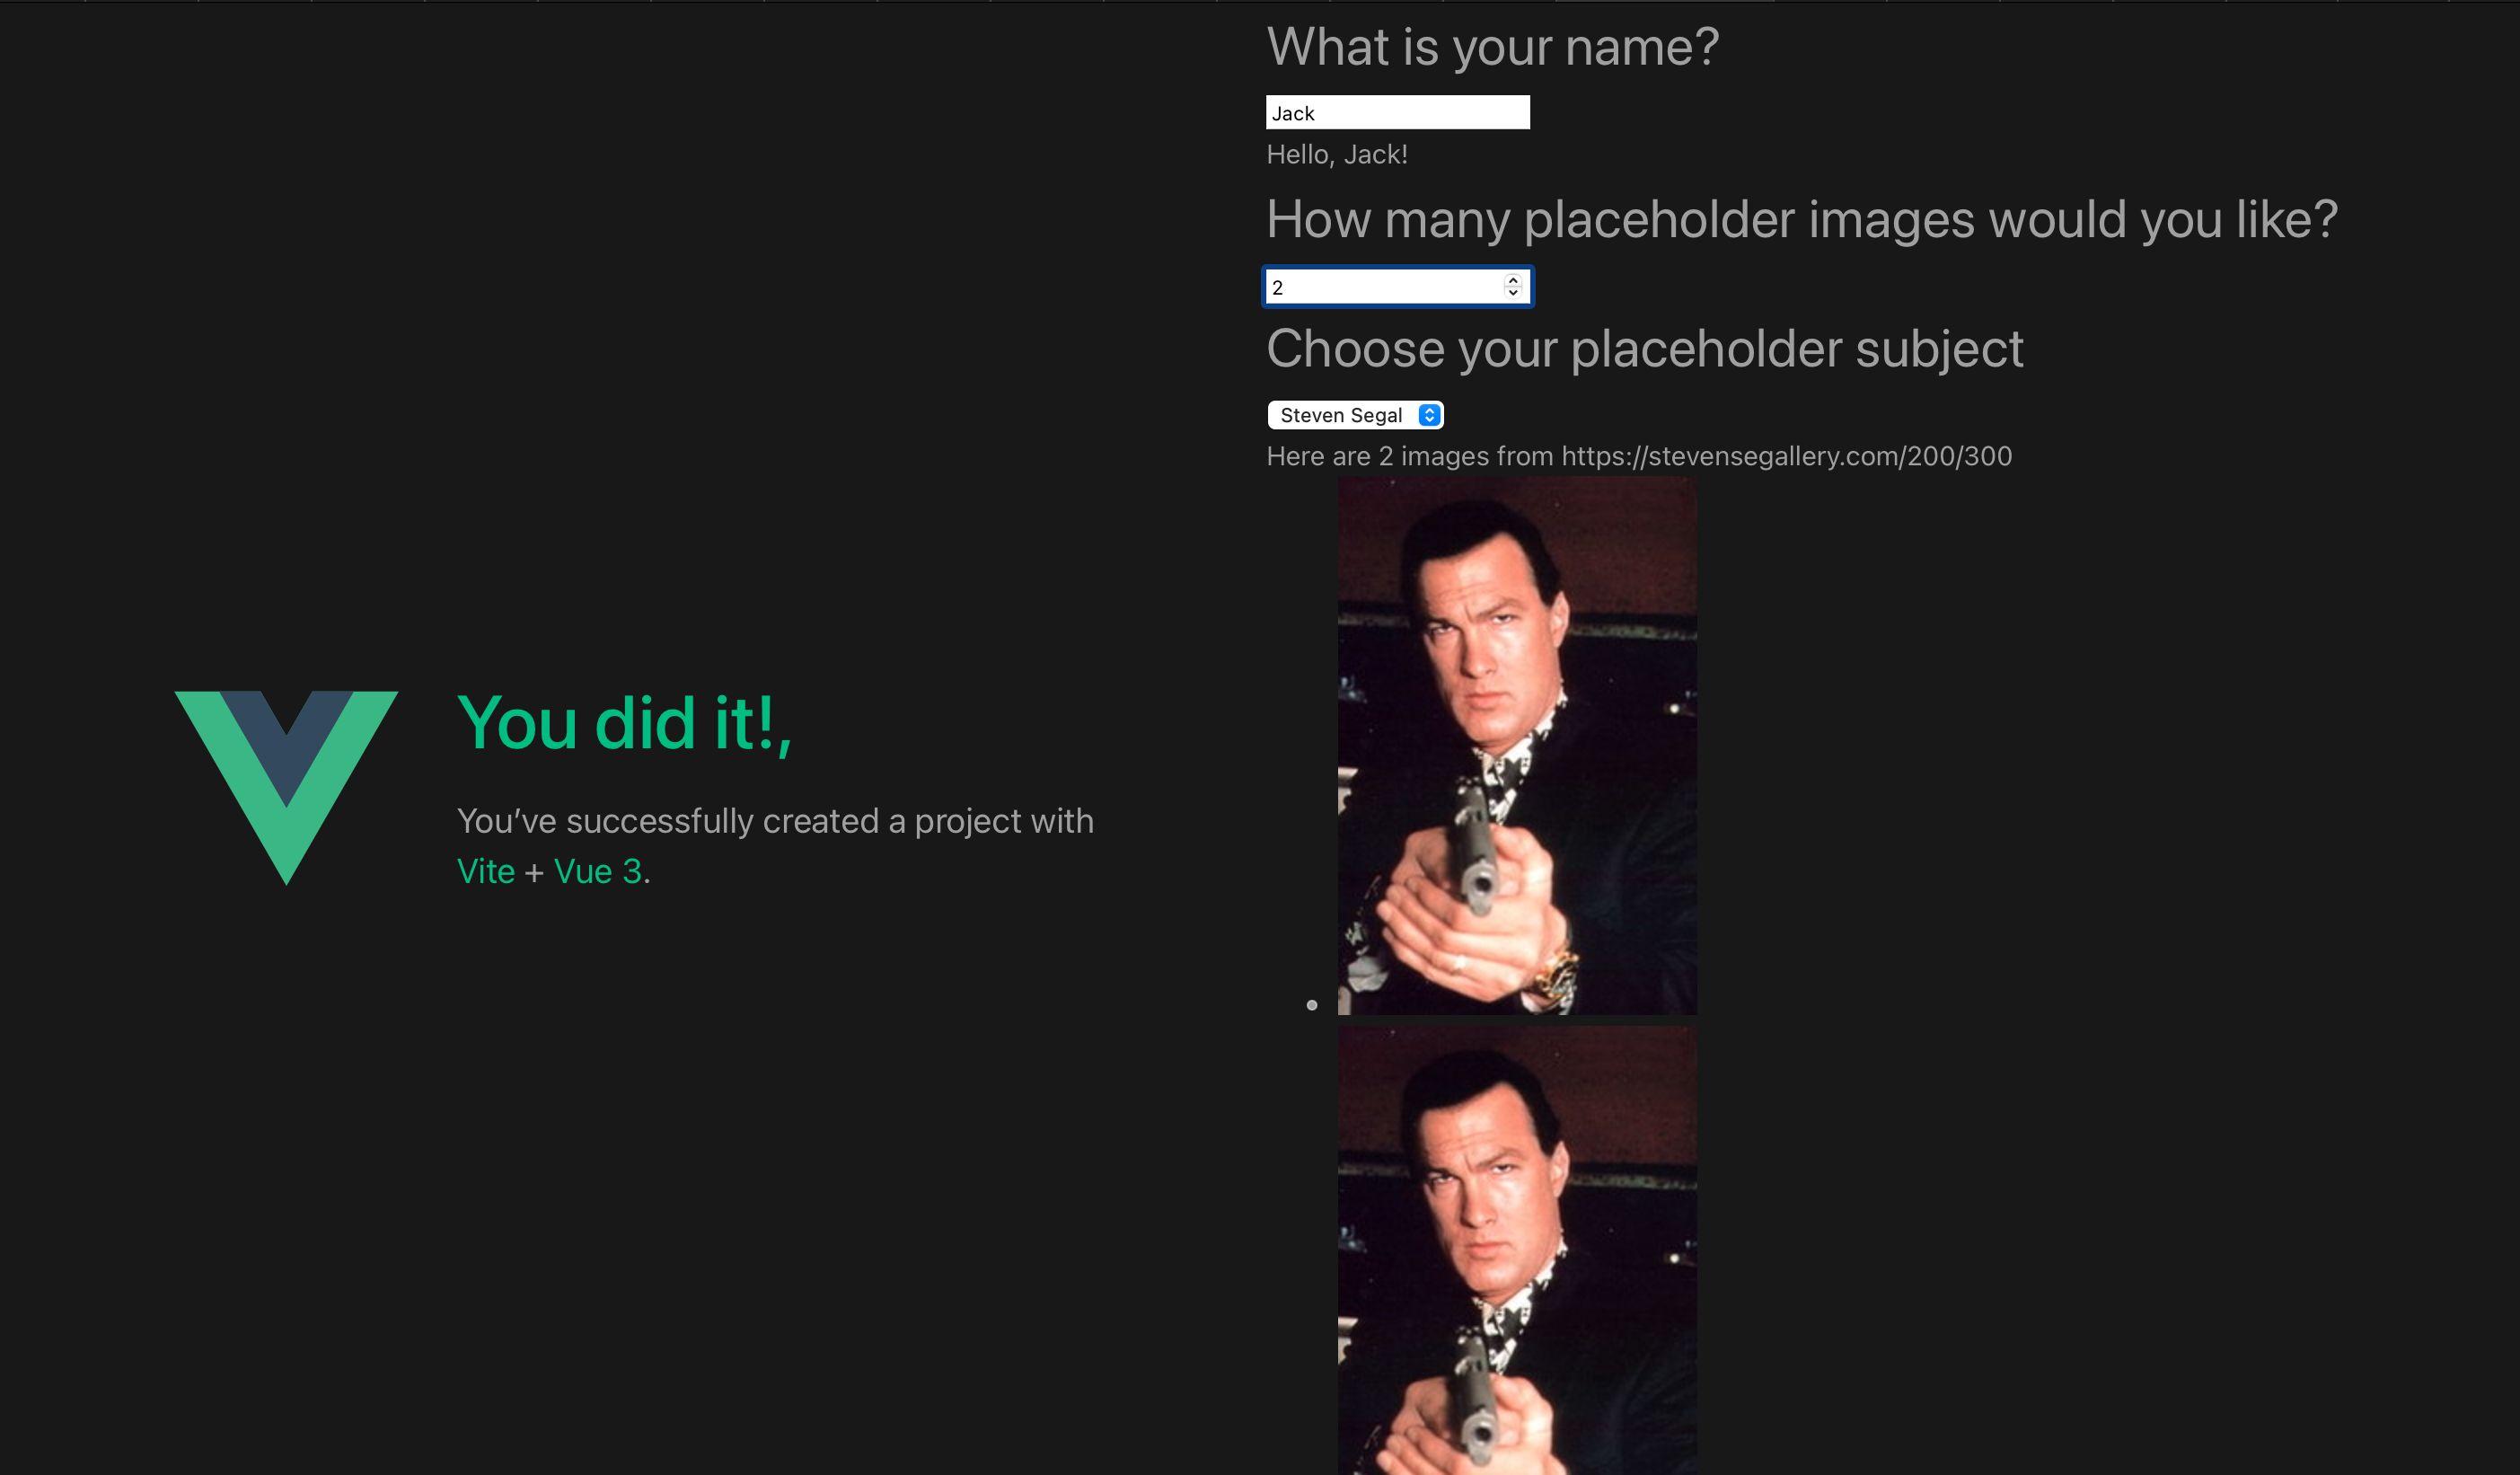 Not the prettiest, but it'll do. Now let's localize.
Language files
There are many ways to store your translations with Vue I18n. I like lazy loading JSON files for the best performance and maintainability.
We're going to store our files in src/locales/ using the ISO 639-1 code and optional ISO 3166-1 country code to name them. We'll default to English and have an option for Mexican Spanish. So, our languages files are:
src/locales/en.json
src/locales/es-mx.json
en.json looks like this:
{
    "your_name": "What is your name?",
    "hello": "Hello, {name}",
    "num_placeholders": "How many placeholders images would you like?",
    "choose": "Choose your placeholder subject",
    "here_are_your_images": "Here is one image from {type}. | Here are {count} images from {type}"
}
And here is es-mx.json
{
    "your_name": "¿Cómo te llamas?",
    "hello": "Hola {name}",
    "num_placeholders": "¿Cuántas imágenes de marcadores de posición le gustaría?",
    "choose": "Elija su tema de marcador de posición",
    "here_are_your_images": "Aquí hay una imagen de {type}. | Aquí hay {count} imágenes de {type}"
}
We just used a machine translation for this, but if the were a serious web app, we would use TranslateCI for higher quality translations and to keep everything up to date.
We're doing a couple of interesting things here. We're using placeholders in curly brackets here to interpolate dynamic content later. And the here_are_your_images key is using pluralization. We separate them with vertical pipes and we'll tell Vue which one to use based on the situation in the section on displaying our translated phrases.
Lazy Loading Our Translation Files
The Vue I18n docs get us pretty far here. We're mostly using the code from their docs to lazy load our translation files. I had a little bit of trouble implementing straight from the docs, but this GitHub example repo provided some helpful hints
First, we're going to create a new file at src/i18n.js that looks like this:
import { nextTick } from 'vue'
import { createI18n } from 'vue-i18n'
import messages from './locales/en.json'

export const SUPPORT_LOCALES = ['en', 'es-mx']

export const i18n = createI18n({
    locale: 'en',
    fallbackLocale: 'en',
    messages: { 'en': messages }
})

export function setI18nLanguage(i18n, locale) {
  if (i18n.mode === 'legacy') {
    i18n.global.locale = locale
  } else {
    i18n.global.locale.value = locale
  }
  /**
   * NOTE:
   * If you need to specify the language setting for headers, such as the `fetch` API, set it here.
   * The following is an example for axios.
   *
   * axios.defaults.headers.common['Accept-Language'] = locale
   */
  document.querySelector('html').setAttribute('lang', locale)
}

export async function loadLocaleMessages(i18n, locale) {
  // load locale messages with dynamic import
  const messages = await import(
    /* webpackChunkName: "locale-[request]" */ `./locales/${locale}.json`
  )
  // set locale and locale message
  i18n.global.setLocaleMessage(locale, messages.default)

  return nextTick()
}
This loads our default translations file and gives us a few exports we can use in our application.
SUPPORT_LOCALES is an array of our support locales.
i18n is our i18n object we'll use when we work with locales, default to English.
setI18nLanguage sets the locale attribute in i18n and the lang attribute in our HTML tag.
loadLocaleMessages takes care of importing our language files.
Then, we'll use i18n in our main.js file:
import { createApp } from 'vue'
import App from './App.vue'
import { i18n } from './i18n'

createApp(App).use(i18n).mount('#app')
Now let's update our component to use Vue I18n.
Updating Our Component
Next we're going to update the Image.vue component to use Vue I18n and the translation strings we defined earlier. It looks like this:
<script>
export default {
    data() {
        return {
            name: '',
            number: '',
            type: '',
        }
    }
}
</script>

<template>
    <div>
        <h1>{{ $t('your_name') }}</h1>
        <input type="text" v-model="name" />
        <p v-if="name">{{ $t('hello', { name: 'Jack' }) }}</p>

        <h1>{{ $t('num_placeholders') }}</h1>
        <input type="number" v-model="number">

        <h1>{{ $t('choose') }}</h1>
        <select v-model="type">
            <option value="https://www.placecage.com/200/300">Nic Cage</option>
            <option value="https://stevensegallery.com/200/300">Steven Segal</option>
        </select>

        <div v-if="number > 0 && type">
            {{ $tc('here_are_your_images', { count: number, type: type}) }}
            <ul>
                <li v-for="n in number"><img :src="type" /></li>
            </ul>
        </div>
    </div>
</template>
Pretty simple, we're just using two functions that Vue I18n provides: $t and $tc.
$t is used for non-pluralized strings. It takes an optional second argument to define any placeholders we put in our language files.
$tc is used for pluralization. The second argument defines any placeholders and a count parameter that determines which phrase to show. Note though that there are many different language-specific pluralization rules. Vue I18n defaults to zero, one or other but you can define other pluralization rules if you need to. Check out the docs for more info if you need it.
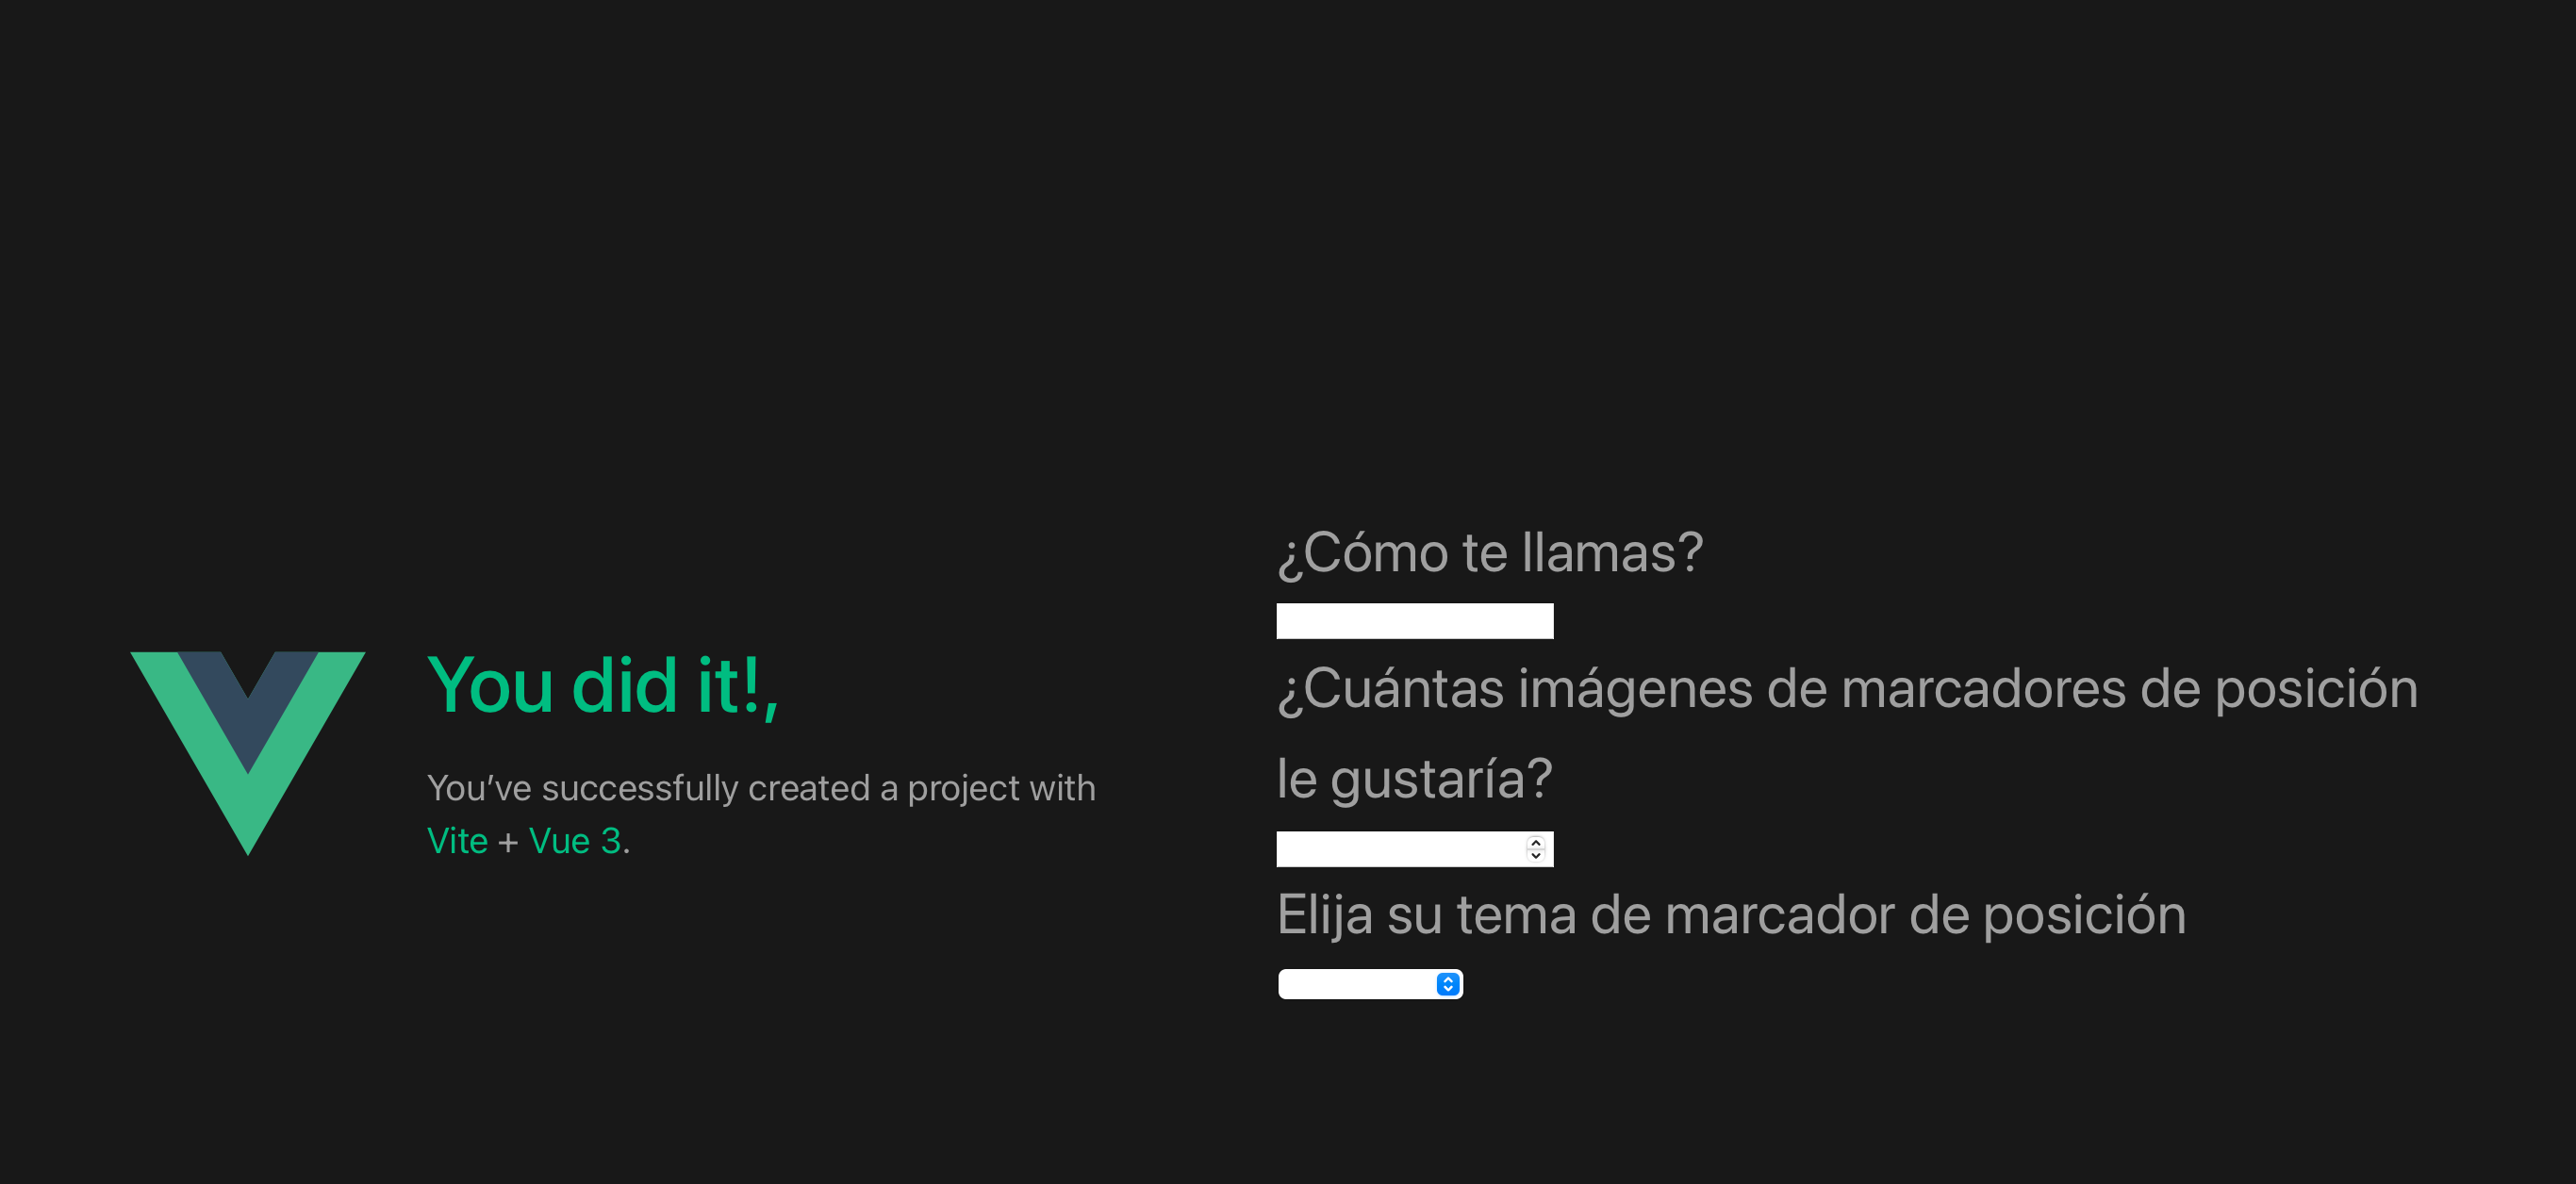
And, if we refresh the page, it looks exactly the same as it did before. BUT, if we manually switch the locale to es-mx by editing main.js:
import { createApp } from 'vue'
import App from './App.vue'
import { i18n, loadLocaleMessages, setI18nLanguage } from './i18n'

createApp(App).use(i18n).mount('#app')
loadLocaleMessages(i18n, 'es-mx')
setI18nLanguage(i18n, 'es-mx')
And now when we refresh:
 Revert
 main.js and we'll create a locale switcher component.
Creating a Locale Switcher Component
Let's create a very simple locale switcher for our application. This will be a simple dropdown that allows the user to select their language. Create a new file at components/LocaleSwitcher.vue that looks like this:
<script>
import { loadLocaleMessages, setI18nLanguage, i18n } from '../i18n'
export default {
    data() {
        return{
            locale: 'en',
        }
    },
    methods: {
        switchLocale() {
            loadLocaleMessages(i18n, this.locale)
            setI18nLanguage(i18n, this.locale)
        }
    }
}
</script>

<template>
    <div>
        <select @change="switchLocale()" v-model="locale">
            <option value="en">English</option>
            <option value="es-mx">Spanish (Mexico)</option>
        </select>
    </div>
</template>
Note you would want to add more validation to make sure the user is submitting a valid locale.
Now, we'll just include this in our Image component:
<script>
import LocaleSwitcher from './LocaleSwitcher.vue'
export default {
  components: { LocaleSwitcher },
    data() {
        return {
            name: '',
            number: '',
            type: '',
        }
    }
}
</script>

<template>
    <div>
        <locale-switcher />
        <h1>{{ $t('your_name') }}</h1>
        <input type="text" v-model="name" />
<!-- ... -->
And we have a working locale switcher!
Where to go from here
Now that you're able to server your application in different languages, it's time to hire translators, export your language files to spreadsheets and make sure everything gets updated whenever you push new features.
OR
You could give TranslateCI a try and make it easy on yourself.